

Expensive software like Photoshop is not necessary to resize large groups of pictures all at once. Mac OS X’s Preview application gets the job done just as easily for free!
Resizing a bunch of images can be a tedious and time consuming task when done manually, one-by-one. Sometimes it’s just plain impossible. That is, after all, why automated tools exist for this kind of task. But instead of investing in specialized software, why not try working with what Apple gives us for free? Users running 10.5 Leopard or 10.6 Snow Leopard can use Preview to batch process photos in just a few simple steps.
- To start off, launch the Preview application and go to the Preferences menu. Make sure “Open all files in one window” is selected.

- Locate all of the image files you want to resize using Finder and open them in Preview. This can be done by dragging them to Preview’s Dock icon or right-clicking the files and choosing Preview from the “Open With” menu.
- When everything has been opened, click on one of your pictures in Preview’s sidebar and press Command+A to select them all. You can also go to Edit > Select All, if you choose.
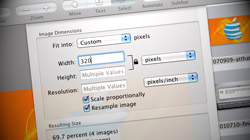
- Select Tools > Adjust Size from the menu bar. Enter the width or height to which you’d like the images to resize, then click OK.

- Go to File > Save All to save your changes.
How about that? A whole lot of time and money saved in just 5 steps! Note that the last step (Save All) overwrites the original files with the new resized images. If you don’t want to lose your originals, try making copies of them in Finder first and then open those in Preview.


February 15th, 2010, 11:03 AM
I have a picture that was originally 9″ x 10″ and took up the whole page. I have resized it to 4″ x 4.5″. When I touch print and the dialog pops up, the image still takes up the entire page only now it is with less resolution. There seems to be no way to have it print only 4 x 4 on the full sheet. I have tried to scale and unchecked fit to page but it still takes up the entire page. Is there something I am missing in Snow Leopard?
Thanks for any help you can give.