Are you tired of looking at generic folder icons or tiny document thumbnails in your Mac’s Dock? Put your own personal spin on Stacks and create custom icons to differentiate them.
Stacks are a fantastic way to organize folders on your hard drive and make them easily accessible from the Dock. The part that’s not so fantastic is how they display. Right-click on any Stack and you’ll see Apple gives us two choices — Display as Folder or Stack. Sometimes that’s just not enough, especially when you’ve got a few that look similar. This tutorial covers a way to go about making a third option.
To give you an example, let’s say I have a Stack in my Dock for a folder called MacYourself. Since I don’t like the generic blue folder icon that is placed there by default, I thought it would be fun if I could use this site’s logo as an icon instead. Not only is it nicer to look at, it also symbolizes what the Stack contains. Here’s how you can do it for yourself:
- Depending on your creative skill level, either find or design a graphic of some kind to use as your icon. As I mentioned, I will be using the MacYourself logo for my example.
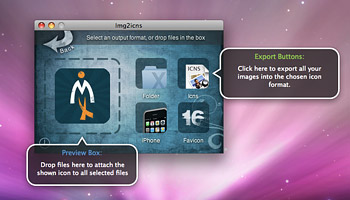
- Download and install a free program called Img2icns. This utility converts image files to Mac icon format (.icns) with a simple drag and drop interface.

- Open Img2icns, drag your chosen icon graphic to the program window.
- Locate the folder you’ll be turning into a Stack using Finder. If a Stack for this folder already exists, you’ll have to remove it temporarily by dragging it away from the Dock.
- Drag the folder from Finder right on top of your custom icon in the Img2icns preview box.
- Back in Finder, the graphic of your choice has replaced that blasted plain blue folder icon. Drag and drop your folder into the Dock to create your new Stack. Remember, Stacks must be positioned to the right of the dashed Dock separator.
- Right-click on the Stack and select “Folder” under Display As.
With any luck your custom Stacks icon should be sitting in your Mac’s Dock!


April 11th, 2009, 2:32 AM
No need to open up the Get Info window to change icons if you’re using Img2icns. Drag the image you want to use for your new icon into Img2icns and then drag your folder on. The app will do the work of changing out the icon for you.