Whenever someone who’s new to Mac OS X uses the Dock for the first time, they’re always intrigued. At first it’s a love affair based on eye candy alone, but the Dock offers much more than just good looks.
Once rookie Mac users actually start delving into the Dock’s numerous magical powers, there’s even more to love than its translucent shelf and shiny icons. It’s surprisingly versatile and a very convenient productivity tool. Hopefully this collection of tips will accelerate the learning curve for those folks and even those who are a little more experienced.
Adding and removing Icons
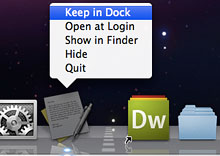
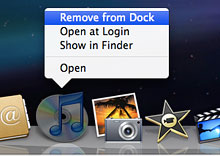
One of the most common questions almost all first-time Mac users ask is, “How do I add or remove icons from the Dock?” Oddly enough, that’s where we’re going to start. If an application is currently open its icon appears in the Dock, but it disappears when you quit. You can keep it there permanently, even when it’s closed, by right-clicking on its icon and selecting “Keep in Dock.” Another method of adding an application (or file/folder) to the Dock is navigating to its location in Finder and simply dragging its icon between two other icons already sitting in the Dock. Finally, there are two ways to remove an icon from the Dock — right-click it and choose “Remove from Dock” from the menu or select & drag it away (it will literally go poof!).


Changing size and placement
Everybody likes their Dock to look a little bit different than the other guy’s. Some like it barely visible and positioned on the bottom, while others like it massive and stuck to the side of the screen. These settings can be changed by going to System Preferences, but there are even better ways to customize your Mac’s Dock. To resize your Dock, roll your mouse over the “crosswalk” separator until you see a line with two arrows replace the standard cursor. Clicking and dragging up and down will increase or decrease the Dock’s size (limited by the width of your screen and number of icons). An even cooler trick is to, again, roll your mouse over the separator and click while holding Shift on your keyboard. Drag the mouse to either side of the screen (still holding Shift) and your Dock will pin itself to the left or right instead of the default bottom position.
Magnification and hiding
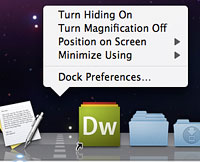
Personally, I think magnification when you roll over icons is what makes the Dock so awesomely fluid and dynamic. Other people feel it’s unnecessary and a meaningless frill. The choice is up to you, of course, and you can easily enable or disable the functionality by right-clicking on the Dock separator.


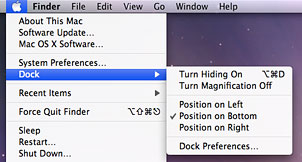
From this same menu, you can turn hiding (which puts the Dock away until you summon it) on or off as well. It’s a lot easier to access these options this way compared to using the Apple menu or System Preferences.


