

When navigating through directories in Finder’s column view, file names often get truncated because they don’t fit in the default column width. Once you know the tricks that follow, that will not longer be a problem.
It’s been all about Snow Leopard here for the past month or so, but we’re going to take a detour and go over some tips that our friends still running 10.5, 10.4, and possibly earlier can enjoy. And don’t worry, early adopters, everything below applies to 10.6 as well. Everyone wins!
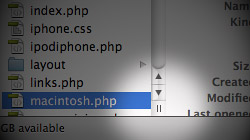
Let’s say you’re drilling down into the heaps of data stored on your Mac. Finder is in column view and you’re having a tough time spotting what you’re looking for because many files with long names are getting cut off. As you probably know, you can click the little draggable handle at the bottom of each column to manually resize them individually. That’s fine, I suppose… but why do things the hard way?
To best demonstrate each of the scenarios below, go to a folder that contains one or more files/folders with names that don’t fit within the default Finder column size.
Manually resize all columns simultaneously
When you go to drag that handle at the bottom of a column, try holding Option on your keyboard at the same time. All of the columns should shrink or grow in unison as you move your mouse left or right.
Automatically resize one column at a time
Instead of dragging the column handle, just double-click it. Notice how that particular column is automatically resized to fit the longest file name in the current directory?
Automatically resize all columns at once
If you’ve got 4 or 5 columns expanded in a Finder window, perhaps only 2 or 3 of them contain files with long names. In that case, you may only want those columns to be wider. Hold Option on your keyboard and double-click any of the column handles. Each column is resized to fit the longest file name it contains.
A similar trick would be to press Shift+Option and double-click on a column handle. All expanded columns are instantly resized to match the longest file name found across all columns. For example, there might be a single column with a 50-character file name. All of your other columns would also be stretched to accommodate a 50-character file name, regardless of whether they have one or not.


October 26th, 2009, 12:16 PM
Ditto to Adawa’s full-view by default wish!