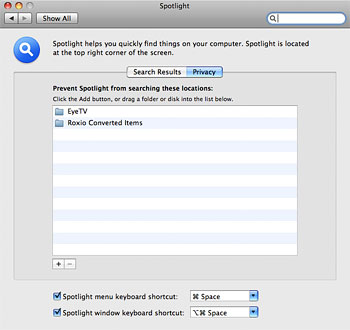
Spotlight allows you to search the files and folders on your Mac instantaneously. Like any computer database, however, it can become corrupt and inaccurate over time. No problem — it’s an easy fix.
To give you an example of when Spotlight might need re-indexing, I’ll share one of my recent personal experiences. Spotlight doubles as an excellent application launcher, in addition to its more well known purpose as a search utility. One day I installed an update to Firefox and hit the keyboard shortcut for Spotlight (Command+Spacebar). Usually typing f-i-r-e will automatically bring up a shortcut for Firefox. Not this time, though. Taking a look at the Applications folder showed that Firefox was there, but Spotlight showed no trace of it. Clearly something was wrong.
The way Spotlight works is by analyzing the entire contents of your hard drive, then storing its findings in a database which it can reference quickly during a search. In my case, the database somehow got screwed up and needed to be reset. Here’s how I was able to fix the problem in literally 20 seconds:
1.) Open System Preferences and click the Spotlight pane.
2.) Click the Privacy tab at the top of the window. Here you will see a list of places that Spotlight has been instructed not to index.

3.) Click the plus (+) button and find your hard drive, or open a separate Finder window and drag your hard drive to the list area.
4.) After a few seconds (3-5 should be enough), select the drive in the System Preferences window and click the minus (-) button.
Spotlight will begin a scan of your entire hard drive and rewrite it’s database from scratch. You may notice that your Mac becomes extremely slow during this time, which is completely normal. In fact, it might be a good idea to walk away from the computer for a while since it could take a few hours to complete. Once it’s done, your searches should be faster, more reliable, and more accurate.


September 2nd, 2009, 8:29 PM
Rob,
Snow Leopard should have automatically re-indexed your entire Mac right after it was installed. If you’re still having problems, though, try this command out in Terminal:
sudo mdutil -E /