


My Photo Stream not updating in Mac Photos app?

Apple’s new Photos app for Mac may suddenly stop automatically importing images from My Photo Stream. That means photos from your iPhone and iPad aren’t making their way onto your Mac like you would expect. Here’s how to make My Photo Stream start syncing to Photos again.
Apple released Photos for Mac as a replacement for iPhoto earlier this year. For most people, the transition was smooth and Photos has been a great upgrade to a much more modern and streamlined app. After using the new app for several months without issue, I recently ran into a problem that prevented my iPhone photos from showing up on my Mac. It seemed to start a couple weeks ago, as I noticed my most recent pictures were missing from the Photos library. I hadn’t changed any settings to cause it – Photo Stream was just suddenly not working on my Mac anymore.

Mac running slow after upgrading to OS X 10.10 Yosemite?
Mac OS X Yosemite is a big release – it includes a bunch of new features that help it integrate better with iOS 8 and includes one of the most significant visual redesigns the Mac operating system has seen in years…

How to delete and forward individual text messages on iOS 7
When iOS 7 was released last fall, it may have seemed like a lot of functionality got stripped away in the name of simplicity. In some cases, that’s true. But when it comes to deleting and forwarding texts in Messages, it’s still possible. To give some quick background to this tip, in previous versions of […]

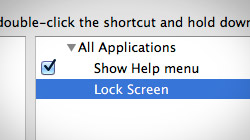
How to lock your Mac screen with a keyboard shortcut
When you need to temporarily leave your Mac unattended, it’s a hassle to put it to sleep and wake it up again. What’s the quickest way? Set up a simple keyboard shortcut that shows your Mac’s login screen without logging you out. Mac users have a bunch of different ways to prevent…
5 simple ways to secure your Mac
Mac OS X is already extremely secure out of the box – especially the latest version, 10.8 Mountain Lion. But that doesn’t mean there aren’t at least a few things you can do to help make your Mac even more safe to use. When it comes to technology…

What Gatekeeper means for users of 10.8 Mountain Lion
As users of 10.8 Mountain Lion settle into their new environment, some of the most common questions about the new operating system relate to Gatekeeper – OS X’s newest security feature. While Gatekeeper is…

iPhone intermittently loses data connection despite full signal
Is your iPhone not connecting to the internet even though it shows a full signal to the cell network? By following a few easy troubleshooting tips, you can usually get your iPhone back online within a minute or two. Occasionally, when I leave a WiFi area like home or…

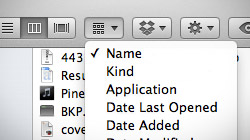
How to arrange and sort files in Finder using Mac OS X Lion
With the introduction of OS X Lion, Apple changed the way file sorting works in Finder. Unfortunately, it has left some users confused as to why selecting Arrange By > Name isn’t working in Finder’s Column view. An interesting issue has been plaguing some…
Free Mac Bundle Giveaway! Dropzone, Socialite and Compartments
A bundle of three great Mac apps is up for grabs! What’s included? Dropzone, a utility that helps you perform common tasks even faster; Socialite, a convenient way to manage your social networks; and Compartments, the simplest way to inventory and protect your valuables…

iTunes “now playing” notifications with song title and artist name
When you’re using your Mac and listening to music in iTunes, wouldn’t it be great if a notification popped up to tell you what song is currently playing? Find out how to display the song title, artist name, and even album cover art while using any app! Have you ever watched…

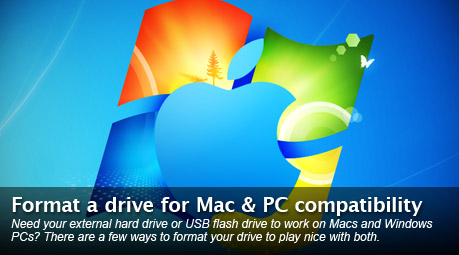
How to format a drive for Mac and PC compatibility
If you have an external hard drive or USB flash drive that you’d like to use on both Macs and Windows PCs, choosing the right file system to format the drive can be confusing. Learn a few ways to make your drive Mac and PC friendly. Need to access or transfer files…

Free Giveaway! Gemini, find & remove duplicate files on your Mac
A new Mac application called Gemini is looking to get some of your hard drive space back. By identifying duplicate files and folders on your Mac, Gemini helps you delete unnecessary clutter you didn’t even know you had. It’s surprising how often we make copies of files and folders on…


- Solution to Finder "Error code -36" in 10.6 when copying folders
- How to reset your Mac OS X password without an installer disc
- How to lock your Mac screen with a keyboard shortcut
- Check your Mac's battery health to see if it needs to be replaced
- The ultimate guide to ejecting a stuck disc from Mac SuperDrive
- Text message fails on iPhone: "Error invalid number" notification
- How to reset password for Mac OS X 10.7 Lion
- A slew of Exposé tips & tricks to show off to your Windows friends
- How to resize a window on your Mac's screen that's too big to drag
- Maximum volume still too quiet? Make MacBook speakers louder
- 10 moves Apple made to change the computer industry forever
- 13 surprising quotes that prove Steve Jobs can predict the future
- Solutions for fixing a Mighty Mouse that won’t right-click reliably
- A slew of Exposé tips & tricks to show off to your Windows friends
- Classic Apple Mac commercials that relentlessly bash PCs
- 7 utilities to transfer music & videos from iPod or iPhone to Mac
- Keep your Mac safe from snoopers on public WiFi networks
- iPhone 3-way conference call feature not working? The fix is in!
- Text message fails on iPhone: “Error invalid number” notification
- Handy guide for Time Machine tricks and troubleshooting tips
- My Photo Stream not updating in Mac Photos app?
- Mac running slow after upgrading to OS X 10.10 Yosemite?
- How to delete and forward individual text messages on iOS 7
- How to lock your Mac screen with a keyboard shortcut
- 5 simple ways to secure your Mac
- What Gatekeeper means for users of 10.8 Mountain Lion
- iPhone intermittently loses data connection despite full signal
- How to arrange and sort files in Finder using Mac OS X Lion
- Free Mac Bundle Giveaway! Dropzone, Socialite and Compartments
- iTunes “now playing” notifications with song title and artist name

